 In the last post of the series of unit testing in TwinCAT we finalized our unit tests, thus creating the acceptance criteria for the expected functionality for our function blocks. Now it’s time to do the actual implementation of the function blocks that we described in part 2 of these series. As we have our unit tests finished, we can anytime during our development run them and check whether the implemented code passes the tests.
In this post we’ll start with two of the five function block which will provide us the parsing functionality for IO-Link events.
FB_DiagnosticMessageDiagnosticCodeParser
The diagnosis code looks like this:
| Diagnosis code | |
|---|---|
| Bit 0-15 | Bit 16-31 |
| 0x0000-0xDFFF | not used |
| 0xE000-0xE7FF | can be used manufacturer specific |
| 0xE800 | Emergency Error Code as defined in DS301 or DS4xxx |
| 0xE801-0xEDFF | reserved for future standardization |
| 0xEE00-0xEFFF | Profile specific |
| 0xF000-0xFFFF | not used |

Diagnostic code parser
Again, a reminder from part 2 of this series:
FUNCTION_BLOCK FB_DiagnosticMessageDiagnosticCodeParser
VAR_INPUT
    anDiagnosticCodeBuffer : ARRAY[1..4] OF BYTE;
END_VAR
VAR_OUTPUT
    stDiagnosticCode : ST_DIAGNOSTICCODE;
END_VAR
We’ll start with the “diagnostic code type”. As shown in the table, these are the two low bytes. We need to convert these two bytes into a 16-bit WORD. Then we need to compare this word to some constants to know whether the diagnostic code type is “ManufacturerSpecific”, “EmergencyErrorCodeDS301”, “ProfileSpecific” or “Unspecified”. The table above tells us that:
- There is an unused range between 0x0000-0xDFFF and another one between 0xF000-0xFFFF
- There is a range reserved for the future, between 0xE801 and 0xEDFF
If our WORD is in between these ranges, we can set the diagnostic code type to “Unspecified”.
The table also tells us that:
- The value for “EmergencyErrorCodeDS301” is 0xE800
- The range for “ProfileSpecific” is 0xEE00-0xEFFF
- The range for “ManufacturerSpecific” is 0xE000-0xE7FF
This gives us enough of information to do a start of the implementation:
VAR
    nDiagnosisCodeType : WORD;
    nDiagnosisCodeTypeLow : WORD;
    nCode : WORD;
    nCodeLow : WORD;
END_VAR
VAR CONSTANT
    cnNotUsedOne_Low : WORD := 16#0000;
    cnNotUsedOne_High : WORD := 16#DFFF;
    cnManufacturerSpecific_Low : WORD := 16#E000;
    cnManufacturerSpecific_High : WORD := 16#E7FF;
    cnEmergencyErrorCodeDS301 : WORD := 16#E800;
    cnReservedForFutureStandardization_Low : WORD := 16#E801;
    cnReservedForFutureStandardization_High : WORD := 16#EDFF;
    cnProfileSpecific_Low : WORD := 16#EE00;
    cnProfileSpecific_High : WORD := 16#EFFF;
    cnNotUsedTwo_Low : WORD := 16#F000;
    cnNotUsedTwo_High : WORD := 16#FFFF;
END_VAR
Here we’re preparing with some variables for the parsing, and also the constants that constitute the fixed information in the table.
Going to the body we want to convert the two bytes into a 16-bit WORD. This can be accomplished by:
- taking the higher byte, converting it into a word and then shifting the bits 8 positions to the left using the SHL-operator.
- taking the lower byte and doing an OR-operation of it together with the above word
The result will be a WORD with the diagnostic code type, which we’ll be able to compare with our constants. For the diagnostic code itself, we’ll do exactly the same thing, i.e. take the two bytes (in the correct order) and convert it into a word. The end result for the body:
nDiagnosisCodeType := BYTE_TO_WORD(anDiagnosticCodeBuffer[2]);
nDiagnosisCodeType := SHL(nDiagnosisCodeType, 8);
nDiagnosisCodeTypeLow := BYTE_TO_WORD(anDiagnosticCodeBuffer[1]);
nDiagnosisCodeType := nDiagnosisCodeType OR nDiagnosisCodeTypeLow;

IF (nDiagnosisCodeType >= cnNotUsedOne_Low AND nDiagnosisCodeType <= cnNotUsedOne_High) OR (nDiagnosisCodeType >= cnReservedForFutureStandardization_Low AND nDiagnosisCodeType <= cnReservedForFutureStandardization_High) OR (nDiagnosisCodeType >= cnNotUsedTwo_Low AND nDiagnosisCodeType <= cnNotUsedTwo_High) THEN stDiagnosticCode.eDiagnosticCodeType := E_DIAGNOSTICCODETYPE.Unspecified; ELSIF nDiagnosisCodeType >= cnManufacturerSpecific_Low AND nDiagnosisCodeType <= cnManufacturerSpecific_High THEN stDiagnosticCode.eDiagnosticCodeType := E_DIAGNOSTICCODETYPE.ManufacturerSpecific; ELSIF nDiagnosisCodeType = cnEmergencyErrorCodeDS301 THEN stDiagnosticCode.eDiagnosticCodeType := E_DIAGNOSTICCODETYPE.EmergencyErrorCodeDS301; ELSIF nDiagnosisCodeType >= cnProfileSpecific_Low AND nDiagnosisCodeType <= cnProfileSpecific_High THEN
    stDiagnosticCode.eDiagnosticCodeType := E_DIAGNOSTICCODETYPE.ProfileSpecific;
END_IF

nCode := BYTE_TO_WORD(anDiagnosticCodeBuffer[4]);
nCode := SHL(nCode, 8);
nCodeLow := BYTE_TO_WORD(anDiagnosticCodeBuffer[3]);
nCode := nCode OR nCodeLow;

stDiagnosticCode.nCode := WORD_TO_UINT(nCode);
Now that we have a finished implementation we can run our tests! Running our unit tests from part 3 will give us the following results:
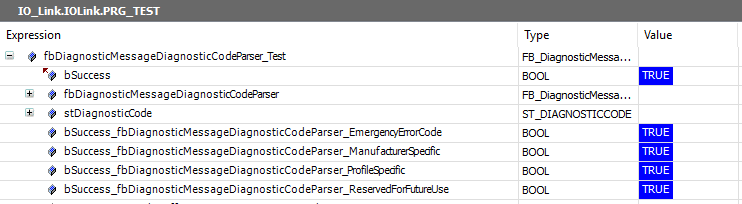
Run-result of FB_DiagnosticMessageDiagnosticCodeParser_Test
All four of our tests passed! Now to be honest when I wrote this guide I actually wrote the implementing code in several steps. First I managed to have one or two of the tests passing, then by rewriting and refactoring the code I made all four tests pass. This is the usual workflow. There are rare occasions when the code works the first time and all tests pass at the first try. But that’s the whole point of test driven development! With the unit tests I can run the tests anytime I want. I’ll write and compile my code until the tests eventually pass! I usually make sure to write the code in such a way that the tests pass, and once that is done I’ll refactor the code so it looks nice as well (and of course re-running the tests so I always can be sure that the code still works!).
FB_DiagnosticMessageFlagsParser
The flags looks like this:
| Flags | |
|---|---|
| Bit 0-3 | 0: Info message 1: Warning message 2: Error message 3-15: Reserved for future use |
| Bit 4 | Time stamp is a local time stamp. |
| Bit 5-7 | Reserved for future use |
| Bit 8-15 | Number of parameters in this diagnosis message |
Our function block receives two bytes and should output a data structure of type ST_Flags, which includes the three data fields “eDiagnosisType”, “eTimeStampType” and “nNumberOfParametersInDiagnosisMessage”.

Flags parser
A reminder from part 2 of this series of how the function block header for this FB looks like:
FUNCTION_BLOCK FB_DiagnosticMessageFlagsParser
VAR_INPUT
    anFlagsBuffer : ARRAY[1..2] OF BYTE;
END_VAR
VAR_OUTPUT
    stFlags : ST_FLAGS;
END_VAR
In these two bytes we have the three parameters “Diagnosis type”, “Timestamp type” and “Number of parameters” stored. Writing the implementing code (function block body) I ended up with:
nFlags.0 := anFlagsBuffer[1].0;
nFlags.1 := anFlagsBuffer[1].1;
nFlags.2 := anFlagsBuffer[1].2;
nFlags.3 := anFlagsBuffer[1].3;

IF nFlags >= 10#0 AND nFlags <= 10#2 THEN
    stFlags.eDiagnostisType := nFlags;
ELSE
    stFlags.eDiagnostisType := E_DIAGNOSISTYPE.Unspecified;
END_IF

IF anFlagsBuffer[1].4 THEN
    stFlags.eTimeStampType := E_TIMESTAMPTYPE.Local;
ELSE
    stFlags.eTimeStampType := E_TIMESTAMPTYPE.Global;
END_IF

stFlags.nNumberOfParametersInDiagnosisMessage := BYTE_TO_USINT(anFlagsBuffer[2]);
Diagnosis type
The diagnosis types are the four first bits of the first byte. We need to create a temporary variable where we can store our intermediate result. We’ll call this variable nFlags and the datatype is BYTE. I store the first four bits from the first byte in this temporary variable. Next I’ll check that the value provided by these four bits are within the range of the E_DIAGNOSISTYPE-enumeration. If it is so, I just map the received value to the enumerated value. If not, I set the value to “Unspecified”.
Timestamp type
If the fifth bit of the first byte is high, the timestamp is local, otherwise it’s global.
Number of parameters in diagnosis message
This is the whole second byte to be parsed, so we just convert the byte to an USINT.
With a finished implementation we can run our tests, and the result is:
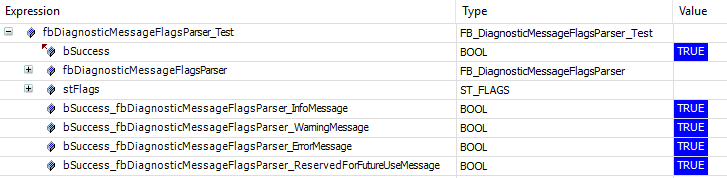
Run-result of FB_DiagnosticMessageFlagsParser_Test
Success! I’d again like to point out that normally I do a quick implementation of parts of the expected functionality so that only parts of the tests succeed before moving on until all tests eventually succeed.
That’s it for this part. Next week we will finish the implementation of the last function blocks for parsing of IO-Link events.
Laptop icon by Freepik from www.flaticon.com