
In part one of this series of posts an introduction was given to a very specific problem that needed to be solved in the ELT project. When doing software maintenance of a subsystem consisting of 132 PLCs, it’s not viable to do it manually as it would be prone to errors and be quite time consuming. In this part of this series we will investigate the more practical problems that needs to be solved for us to do the automated deployment of the software to all PLCs.
Let’s start to think about the problem we want to solve by defining the requirements that it shall fulfill. This way we can work in a structured way and have something that we can verify our solution against. When I develop software using the automation interface (AI) I define the procedures involved, i.e. the clicks and steps that I would normally do manually. It’s necessary to carefully analyze what assumptions are made about the state of the target device prior to doing this mass-deployment of software to the PLCs. The reason for this is that normally many steps of the software development is done automatically and never thought of as part of the process for this. An example of this is the selection of “Autostart Boot Project” of every PLC runtime, which makes sure that the tasks contained within this project are automatically started.
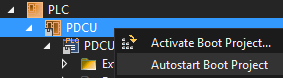
Autostart of Boot Project
Then you also need to look at the steps which are not directly related to the software development, but instead related to the environment of where the software will be deployed. When developing the software for a single PLC, you might be connected directly to the PLC with a separate network interface. The PLCs might however run in an environment where certain features are disabled, by blocking certain types of traffic/ports. I’ll come back to this topic later.
Because the Visual Studio DTE and the TwinCAT AI does exactly what you tell it to do, you need to know what should be done. Describing the deployment of software for a single PLC involves eight steps:
- Starting the version of Visual Studio that was used to create the project
- Opening the solution
- Adding an AMS-route to the target through the AMS-router
- Selecting the target device
- Enabling the autostart boot flag
- Selecting the target architecture
- Enabling boot project
- Activation of the configuration
Even with this detailed list there are many assumptions made about the state of the PLC. For example, it’s assumed the PLC has the correct version of TwinCAT installed and a running AMS-router, and that it has a configured network interface and that any supplements (such as OPC-UA server) are already installed. It’s also assumed that all dependencies of the different libraries are installed and with the correct version. These and many other assumptions need to be carefully analyzed and if possible, automated as well. What follows is the necessary code to execute the steps 1..8 above.
Step 1 & 2
Remember the picture where I compared the VS DTE and the TwinCAT AI?
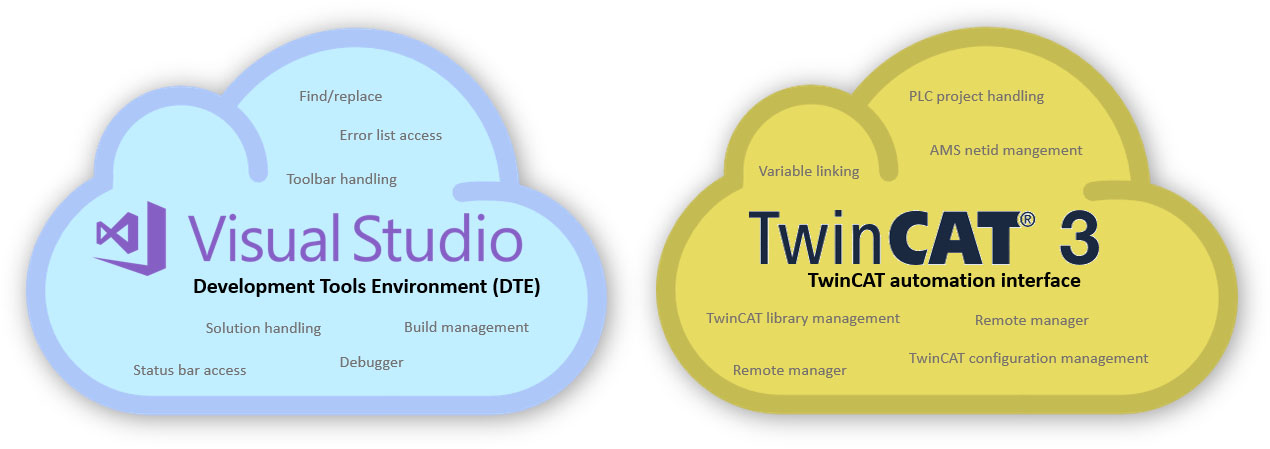
The first two steps of our list only require the DTE as these are pure VS-interactions, while the other six steps require the AI to execute.
You can write the software in many different languages. Any COM-capable languages (like C++ and .NET) and various scripting languages (like Windows PowerShell and IronPython) can be used. In this example, I will be using C#/.NET simply because of the reason that most of the Beckhoff documentation and examples are using this environment.
First, create a C#/.NET console application. In the solution tree, right click on References and select Add Reference.
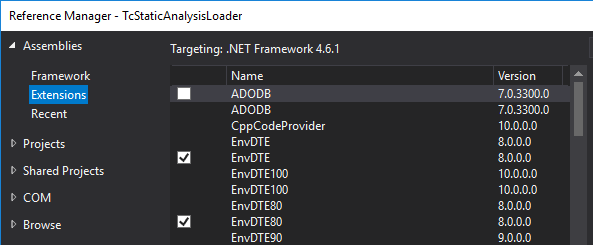
References for the DTE
In the Assemblies -> Extensions, select EnvDTE and EnvDTE80. This will give you access to the VS DTE. Click on COM and select Beckhoff TwinCAT XAE Base X.Y Type Library, which is what will give you access to the automation interface.

Addition of the automation interface
To access the DTE and AI you need use the using directive.
using EnvDTE80;
using TCatSysManagerLib;
Now you’ve got full access to both interfaces. Let’s start by initializing the DTE. For this you need to define which version of Visual Studio shall be used. For this we are using the version number, according to:
| Product name | Version number |
|---|---|
| Visual Studio 2019 | 16.0 |
| Visual Studio 2017 | 15.0 |
| Visual Studio 2015 | 14.0 |
| Visual Studio 2013 | 12.0 |
| Visual Studio 2012 | 11.0 |
| Visual Studio 2010 | 10.0 |
| Visual Studio 2008 | 9.0 |
| Visual Studio 2005 | 8.0 |
| Visual Studio .NET 2003 | 7.1 |
| Visual Studio .NET 2002 | 7.0 |
In this example we will be setting the version statically. In a production environment I would highly recommend to get this version dynamically, as the version number is included in the solution (*.sln) file of the TwinCAT project.
EnvDTE80.DTE2 dte = System.Type.GetTypeFromProgID("VisualStudio.DTE.15.0");
dte.SuppressUI = true;
dte.MainWindow.Visible = false;
dte.UserControl = false;
If the correct version of VS is not installed GetTypeFromProgId() will return an exception, which should be handled accordingly (note: for the remainder of this series will skip handling exceptions, which of course should be implemented). Because we set the version of VS used by the DTE, this particular version needs to be installed on the build machine. By setting SuppressUI and Visible properties in this way visual studio doesn’t popup when launching the script. The line dte.UserControl = false is very important as it guarantees the development environment (i.e. VS) shuts down properly once the DTE is not used anymore. If this line is not included, you’ll end up having hundreds of instances/processes of visual studio running in your system after a while eating up all system resources. I learned this the hard way.
Now that we DTE prepared, we need to tell the DTE which solution we want to use.
EnvDTE.Solution visualStudioSolution = dte.Solution;
visualStudioSolution.Open(@filePath);
The @filePath is a string containing the full path to the *.sln-file of the TwinCAT project (i.e. “C:\Code\workspace\TcProject\TcProject.sln“). This path needs to be provided as an input parameter to our program. To parse input arguments from a C#-program I like to use NDesk.Options. Finally, we need to load the actual TwinCAT-project that is residing in the solution:
EnvDTE.Project pro = visualStudioSolution.Projects.Item(1);
Note that we so far have not used the TwinCAT automation interface at all, but only the VS DTE.
Step 3
Adding an AMS-route is something specific for TwinCAT and will thus require the AI. Creating AMS-routes manually is a time-consuming process as it’s not possible to create more than one simultaneously, thus it makes sense to try and automate it. Two different approaches can be used for this step.
- Do a broadcast search (using the AI), and add all devices found in the broadcast search
- Statically define all targets (using IP-address, AmsNetId etc.) and add all targets based on this information
Even though #1 initially seems to make most sense, there are some drawbacks with it. First, it assumes the network allows to do a broadcast search. Not all networks might allow this, as it can create unwanted network traffic which is especially important to consider when designing deterministic networks. Second, the firewall in the PLC might be configured to block the AMS broadcast search as it is transmitted on a specific UDP-port (48899). Third, there might be devices with an AMS-router in the network that you don’t want to create routes to (for instance, localhost is such an example in this case). This means you would need to create a list of exceptions, which would defeat the whole purpose of the broadcast strategy. Instead going for #2, we need to define the input-format for the different targets. But before doing that, it’s necessary to investigate exactly what data is necessary to create the AMS-route. Luckily for us, Beckhoff have provided us with an example in their documentation, and doing our own slightly elaborated example with three hosts:
<?xml version="1.0" encoding="ISO-8859-1"?>
<TreeItem>
    <ItemName>Route Settings</ItemName>
    <PathName>TIRR</PathName>
    <RoutePrj>
        <TargetList>
            <BroadcastSearch>false</BroadcastSearch>
        </TargetList>
        <AddRoute>
            <RemoteName>CX-4286EE</RemoteName>
            <RemoteNetId>10.0.2.15.1.1</RemoteNetId>
            <RemoteIpAddr>192.168.43.85</RemoteIpAddr>
            <UserName>Administrator</UserName>
            <Password>1</Password>
            <NoEncryption/>
        </AddRoute>
        <AddRoute>
            <RemoteName>CX-4286F1</RemoteName>
            <RemoteNetId>10.0.3.22.1.1</RemoteNetId>
            <RemoteIpAddr>192.168.43.86</RemoteIpAddr>
            <UserName>Administrator</UserName>
            <Password>1</Password>
            <NoEncryption/>
        </AddRoute>
        <AddRoute>
            <RemoteName>CX-4253DD</RemoteName>
            <RemoteNetId>10.0.2.16.1.1</RemoteNetId>
            <RemoteIpAddr>192.168.43.87</RemoteIpAddr>
            <UserName>Administrator</UserName>
            <Password>1</Password>
            <NoEncryption/>
        </AddRoute>
    </RoutePrj>
</TreeItem>
This XML can be used by the ConsumeXml()-method residing in the ITcSmTreeItem-interface, which I’ll get back to in a minute.
The username and password might be the same for all PLCs and thus this information could be hard-coded (though this is not recommended for various reasons). Even if the passwords have been changed for all PLCs, it’s still not recommended to store them as plain text, for which special consideration would have to be needed. Other than that, we need to define the hostname, the AmsNetId and the IP-address of the target. One solution for this is simply to store the complete configuration of all PLCs in an XML-file, which path is included as an input-parameter for the program. Handling XML in C#/.NET is straightforward, and there are several libraries to handle this. I use the XmlDocument-class built-in to .NET for all parsing and generation of XML-documents. With this class you can parse your (own-defined) XML-file and generate the complete XML-string which is to be consumed by the ConsumeXml()-method in the AI. Create a class or structure to hold the target definition for a PLC.
class Target {
    public string hostName;
    public string netId;
    public string ipAddr;
    public string username;
    public string password;
}
And define a class holding the Targets in an ArrayList.
public class AMSRoutes {
    public ArrayList items = new ArrayList();
}
Next we will need to define a class to create the string that will be consumed by the AI to create the routes. For the sake of simpleness we’ll create this as a singleton class.
class AutomationInterfaceXML {
    // Singleton constructor
    private AutomationInterfaceXML()
    { }
}
We’ll create a method in this class that takes AMSRoutes and returns a string.
/// <summary>
/// This will produce a XML-string that can be consumed for creation of AMS-routes
/// provided by the routesList input argument
/// </summary>
/// <returns>
/// An XML-string that can be consumed by the TwinCAT automation interface for creation of all the AMS-routes
/// </returns>
/// <param name="routesList">The list of AMS-routes</param>
public static String CreateRoutesXMLString(AMSRoutes routesList) {
}
In the body of this method we need to declare a XmlDocument and start populating it with all the different child objects. The usage of the different XML-classes is straightforward. You define a node and then create new nodes which you append as child objects to the root-node. By setting “InnerText” you define what text should be inside an XML-tag. Let’s start with everything up until all the targets (AddRoute).
XmlDocument xmlDoc = new XmlDocument();

//Create the root element
//<TreeItem>
XmlNode TreeItemElement = xmlDoc.CreateElement("TreeItem");
xmlDoc.AppendChild(TreeItemElement);

//<ItemName>
XmlNode itemNameElement = xmlDoc.CreateElement("ItemName");
itemNameElement.InnerText = "Route Settings";
TreeItemElement.AppendChild(itemNameElement);

//<PathName>
XmlNode pathNameElement = xmlDoc.CreateElement("PathName");
pathNameElement.InnerText = "TIRR";
TreeItemElement.AppendChild(pathNameElement);

//<RoutePrj>
XmlNode routePrjElement = xmlDoc.CreateElement("RoutePrj");

//<TargetList><BroadcastSearch>
XmlNode targetListElement = xmlDoc.CreateElement("TargetList");
XmlNode broadcastSearchElement = xmlDoc.CreateElement("BroadcastSearch");
broadcastSearchElement.InnerText = "false";
targetListElement.AppendChild(broadcastSearchElement);
routePrjElement.AppendChild(targetListElement);
Next we need to iterate over the routesList and add each route as a separate AddRoute-node.
// For every route
foreach (Target target in routesList.items) {
    // <AddRoute>
    XmlNode addRouteElement = xmlDoc.CreateElement("AddRoute");
    // <RemoteName>
    XmlNode remoteNameElement = xmlDoc.CreateElement("RemoteName");
    remoteNameElement.InnerText = target.hostName;
    addRouteElement.AppendChild(remoteNameElement);

    // <RemoteNetId>
    XmlNode remoteNetIdElement = xmlDoc.CreateElement("RemoteNetId");
    remoteNetIdElement.InnerText = target.netId;
    addRouteElement.AppendChild(remoteNetIdElement);

    // <RemoteIpAddr>
    XmlNode remoteIpAddrElement = xmlDoc.CreateElement("RemoteIpAddr");
    remoteIpAddrElement.InnerText = target.ipAddr;
    addRouteElement.AppendChild(remoteIpAddrElement);

    // <UserName>
    XmlNode userNameElement = xmlDoc.CreateElement("UserName");
    userNameElement.InnerText = target.username;
    addRouteElement.AppendChild(userNameElement);

    // <Password>
    XmlNode passwordElement = xmlDoc.CreateElement("Password");
    passwordElement.InnerText = target.password;
    addRouteElement.AppendChild(passwordElement);

    // <NoEncryption>
    XmlNode noEncryptionElement = xmlDoc.CreateElement("NoEncryption");
    addRouteElement.AppendChild(noEncryptionElement);

    routePrjElement.AppendChild(addRouteElement);
}
And finishing the method by appending the root-element and returning the complete XML as a string.
TreeItemElement.AppendChild(routePrjElement);
return xmlDoc.OuterXml;
Now that we have our XML ready to be consumed, we can start looking at how to use the automation interface to create the AMS routes. The AI requires a visual studio project to create the AMS routes. This can be any project and doesn’t necessarily need to be the project that we want to activate on the PLCs. For this example, we’ll use the TwinCAT project that we have already loaded previously. What we want to do now is to create a handle to the main interface of the AI, the ITcSysManager.
ITcSysManager10 sysManager = pro.Object;
The ITcSysManager gives access to all core functionality in TwinCAT. Mentally I think of the ITcSysManager as giving access to the most basic TwinCAT operations, such as creating/saving/activating configurations, setting/getting the target AmsNetId, browsing the project-tree of a TwinCAT project and much more. As soon as you want to do something else (accessing all functionality of the SYSTEM/PLC/IO in the solution explorer, handling the different PLC libraries, linking variables, etc.) you need an instance to another interface in the AI. All other operations in the AI require a reference to the ITcSysManager. Now why did I create an instance of the ITcSysManager10 and not just ITcSysManager? As the TwinCAT automation interface grows, Beckhoff add more and more functionality to it. And with every increment the new ITcSysManager extends the previous one. If we for example look at the definition for ITcSysManager10 it looks like:
public interface ITcSysManager10 : ITcSysManager9
And so it goes all the way down to the ITcSysManager. What I usually do when I use the AI is to use the latest interface at the point of which the project was created. Next we need to define an instance of the interface ITcSmTreeItem. This gives access to the different tree items in the TwinCAT XAE. These are not only the items that are physically available as tree items in the solution explorer (which I wrongfully thought in the beginning), but all other TwinCAT XAE specific functionality as well. To get a handle to a tree item we need to call LookupTreeItem() (available in ITcSysManager) providing the full path for the tree item. Beckhoff have provided some shortcuts to various (commonly used in the AI) objects.
"TIIC": shortcut for "I/O Configuration"
"TIID": shortcut for "I/O Configuration^I/O Devices" or "I/O Configuration" TAB "I/O Devices"
"TIRC": shortcut for "Real-Time Configuration"
"TIRR": shortcut for "Real-Time Configuration^Route Settings"
"TIRT": shortcut for "Real-Time Configuration^Additional Tasks" or "Real-Time Configuration" TAB "Additional Tasks"
"TIRS": shortcut for "Real-Time Configuration^Real-Time Settings" or "Real-Time Configuration" TAB "Real-Time Settings"
"TIPC": shortcut for "PLC Configuration"
"TINC": shortcut for "NC Configuration"
"TICC": shortcut for "CNC Configuration"
"TIAC": shortcut for "CAM Configuration"
“TIRR” is what is interesting for our AMS-routes creation as this is part of the route settings.
ITcSmTreeItem routes = sysManager.LookupTreeItem("TIRR");
Through the ITcSmTreeItem interface we can interact with the Real-Time configuration object that we have just created. One of the methods that the ITcSmTreeItem has is ConsumeXml(string bstrXML). This allows us to insert the XML-string created by our
CreateRoutesXMLString() method.
string routesXmlString = AutomationInterfaceXml.CreateRoutesXMLString(routesToBeAdded);
routes.ConsumeXml(routesXmlString);
ConsumeXml() will throw an exception if one of the routes fail to be added. An option to create all routes at once is to simply create them one by one by doing a call to ConsumeXml for every PLC (although with only one AMS-route in the XML-list). The advantage of this is that we will know whether we have working communication to all AMS targets prior to do any eventual upgrade of the software. I would want to finish this step by saying that it’s important that you consider all kinds of use-cases for this application. For example, what should we do if one of the PLCs breaks and we only want to apply the software to one PLC and not all? The same can be said if only one PLC is not reachable, do we want to continue uploading the new software to the other PLCs or break? In this case it might be interesting to add an option where we only select a subset of all the devices in the XML-file to apply the commands to.
Now that we have AMS-routes created to all PLCs. In the next (and final) part we will investigate uploading the new software to the PLCs.
ELT in operation by ESO/L. Calçada from www.eso.org
Excellent article, well documented. Thank you for sharing!