
In one subsystem of the extremely large telescope (ELT) there are 132 Beckhoff PLCs running TwinCAT3, and this large amount has brought some interesting challenges to the ELT project. Upgrading the entire system one PLC at a time would be time consuming and prone to errors. When there is need for automation, the TwinCAT automation interface comes to the rescue. In the final part we go through the steps necessary to do the actual build and deployment to the software to all PLCs.
Doing an update of the PLC software consists of eight steps, and as a reminder from the previous post they are:
- Starting the version of Visual Studio that was used to create the project
- Opening the solution
- Adding an AMS-route to the target through the AMS-router
- Selecting the target device
- Enabling the autostart boot flag
- Selecting the target architecture
- Enabling boot project
- Activation of the configuration
In the previous post we went through step 1-3, and here we will go through the step 4-8. We finished the previous post by creating all the AMS routes to all PLCs, which means we have a working connection between the build machine and all PLCs, and we are in a state where we can start uploading the new software to all PLCs.
Step 4
The step 4 to 8 is something that we want to do for each PLC. In the previous post we created a list of AMSRoutes, which holds a list of targets, which is defined according to:
class Target
{
    public string hostName;
    public string netId;
    public string ipAddr;
    public string username;
    public string password;
}
We need to iterate this list to do step 4-8 in the iterator.
// For every AmsNetId (PLC)
foreach (Target t in amsTargets.items)
{
    // All steps will go in here
}
Selecting which PLC is currently the active target is done by selecting the correct AMSNetId as target, which is done through the target selection window:
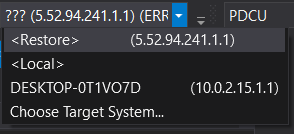
Target selection
The equivalent function through the AI is SetTargetNetId which is accessible through the ITcSysManager interface.
sysManager.SetTargetNetId(t.netId);
Step 5-8
The setting of the autostart boot flag for a PLC project is information that is stored on the actual target device and not in the PLC project itself.
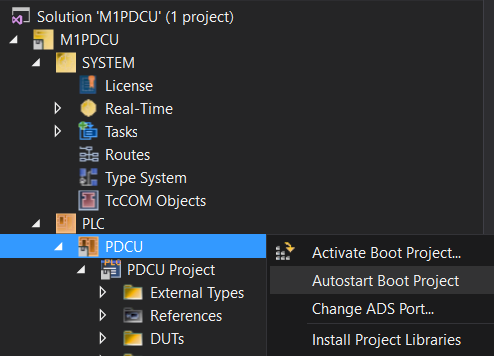
Boot project
What happens when the Autostart Boot Project option is selected is that an empty file is created called Port_xxx.autostart (xxx being 851 for first PLC runtime) on the target PLC in the folder C:\TwinCAT\3.1\Boot\Plc\. This makes sure that that particular PLC runtime is automatically started, which is what we want in our case. It’s also necessary to select the Activate Boot Project selection, which will make sure to activate the selected PLC runtime on the target device. In TwinCAT3 it’s possible to have up to four PLC runtimes.

Up to four PLC projects in a TwinCAT solution
It’s possible to create the PLC project independently of the rest (though it later needs to be integrated to the main solution).
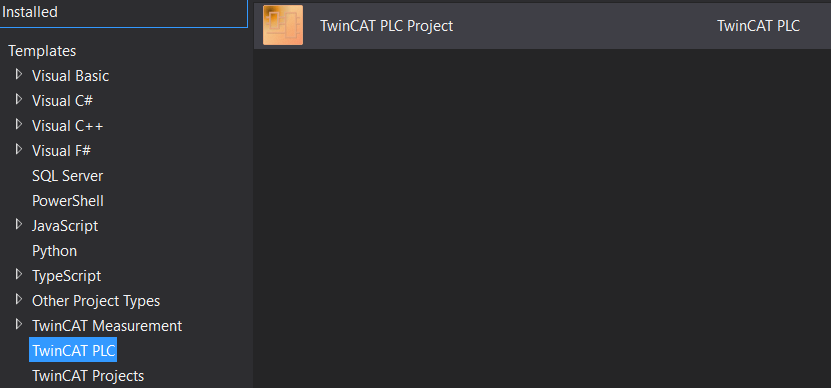
TwinCAT PLC project
Because the PLC projects are independent of each other, we need to do the autostart/active boot project for all of them by setting them individually one by one. To get access to the PLC items in the TwinCAT automation interface we can again use a shortcut, in this case “TIPC”. Just as with the example in the previous post, we’ll access it using the ITcSysManager interface which will give us an ITcSmTreeItem object.
ITcSmTreeItem plcTreeItem = sysManager.LookupTreeItem("TIPC");
int plcChildCount = plcTreeItem.ChildCount;
plcTreeItem gives us access to all PLC projects that reside within the TwinCAT XAE solution. To access each individual PLC project the plcTreeItem has an array of ITcSmTreeItem-childs, which can be typecasted to the ITcPlcProject type. Once we have a handle on the PLC project itself, we can generate the boot project and set the autostart boot flag on each individual PLC project.
log.Info("Enabling boot project and setting BootProjectAutostart on " + sysManager.GetTargetNetId());

// Enable autostart-flag on all PLC-projects, as this flag is not stored in the project itself but rather on the target
for (int i = 1; i <= plcChildCount; i++)
{
    ITcSmTreeItem plcProject = plcTreeItem.Child[i];
    ITcPlcProject iecProject = (ITcPlcProject)plcProject;
    iecProject.GenerateBootProject(true);
    iecProject.BootProjectAutostart = true;
}
Next we need to activate the complete configuration, which is normally done by pressing the Activate Configuration button:
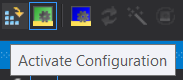
Activate configuration
With the TwinCAT automation interface, this is available by calling ActivateConfiguration() accessible through the ITcSysManager interface.
sysManager.ActivateConfiguration();
And while we’re at it we can also restart the TwinCAT kernel on the target device so that the new version of the software is loaded into memory. This is achieved by doing a call to StartRestartTwinCAT located in the ITcSysManager interface.
log.Info("Restarting the TwinCAT kernel on target " + sysManager.GetTargetNetId());
sysManager.StartRestartTwinCAT();
And we’re done! The purpose of this example was to show how to create a project using the automation interface, as well as showing how easy it is to use it. I suggest you write your own code following the SOLID principles, and thus obviously you need to refactor the code into several classes, each having their domain of responsibility. There are many good selections for classes here, such as a class just taking care of the visual studio development tools environment (DTE), another one of the automation interface while a third one takes care of all XML. Exceptions should be properly handled and not ignored. By using a combination of the VS DTE and the automation interface, it is possible to do an upgrade of all 132 PLCs in this particular subsystem in the ELT in about half an hour, which if we do several deployments in parallel and not in series can probably be made even faster. By carefully analyzing the problem, and understanding the steps involved in the upgrade of the software it is possible to fully automate this process.
I hope you’ve enjoyed this series of posts where I’ve tried to show how a real-world problem in a big scientific project can be solved. I’m looking forward to the construction of the ELT being finished. I’m very happy that I’ve been given the opportunity to contribute to such an important instrument and I can’t wait until the day (or night) the PLCs are running under the night sky contributing to a deeper understanding of the universe.

A colleague and me beneath the starry sky in Paranal
The ELT showing the secondary mirror housing by ESO/L. Calçada/ACe Consortium from www.eso.org
Hey great Content !!
Is there a way to upload the whole configuration on the target Device though?
Like generating a copy of the configuration on the target device and then activating it?
It seems like there’s no Functions for this in the AI API.
Thanks!!
Hi Mehdi! There are two ways to accomplish this:
Hi,
Is your code for the Automation Interface available? Would be nice to take a look. I’m having some issues linking various parts of the TwinCAT project i.e. an encoder to the terminal.
Nice work!
Hi Paul! No unfortunately not, as this belongs to ESO. I have another project that’s using the TwinCAT automation interface on GitHub though (this does not do any I/O linking though).
Hi Jakob,
Thank you for the great content you created.
I do have one quieston in regards of opening TwinCat3 solution that is Encrypted. I was not able to find anywhere information of how to open already encrypted PLC by passing Username and Password from the C# automation interface.
Thank you for the time you take to review and respond to the post.