
 In part five of these series we started the implementation of the function blocks that we previously have done unit tests for. As we have our tests, we could verify that our newly implemented code did what it is supposed to do, and thus we made our code pass the tests. What we’ve got left is to do the implementation for three of the remaining function blocks. Once this is done, we have implemented all the required functionality that we’ve declared that our unit tests require us to.
We made the unit tests for these three function blocks in part 4 of this series. The remaining function blocks to implement are:
- FB_DiagnosticMessageTextIdentityParser
- FB_DiagnosticMessageTimeStampParser
- FB_DiagnosticMessageParser
FB_DiagnosticMessageTextIdentityParser
This one is easy. We get two bytes in, and we convert those to an 16-bit unsigned integer.

Diagnostic text identity parser
A reminder from part 2 of what the function block header looks like:
FUNCTION_BLOCK FB_DiagnosticMessageTextIdentityParser
VAR_INPUT
    anTextIdentityBuffer : ARRAY[1..2] OF BYTE;
END_VAR
VAR_OUTPUT
    nTextIdentity : UINT;
END_VAR
What we can do is to first convert the two bytes into a WORD using the open source OSCAT basic library function WORD_OF_BYTE. This function takes two bytes in, and delivers a WORD as a result. The next step is to convert the WORD to an UINT by simple 61131-3 type-conversion.
For the body, this is what I ended up with:
nTextIdentity := WORD_TO_UINT(WORD_OF_BYTE(B1 := anTextIdentityBuffer[2],
                                           B0 := anTextIdentityBuffer[1]));
Running our three unit tests that we defined in part 4 we get the result:

Run-result of FB_DiagnosticMessageTextIdentityParser_Test
FB_DiagnosticMessageTimeStampParser
The timestamp parser takes an etherCAT distributed clock (DC) timestamp (8 bytes), information of whether the timestamp is a local or global timestamp and delivers a human-readable string as output.

Diagnostic time stamp parser
A reminder from part 2 of what the function block header looks like:
FUNCTION_BLOCK FB_DiagnosticMessageTimeStampParser
VAR_INPUT
    anTimeStampBuffer : ARRAY[1..8] OF BYTE;
    bIsLocalTime : BOOL;
END_VAR
VAR_OUTPUT
    sTimeStamp : STRING(29);
END_VAR
As we decided in part 2, if the diagnosis event timestamp is based on a local clock, we’ll just use the current task DC-time (available by using the Beckhoff function F_GetCurDcTaskTime64() located inside the Tc2_EtherCAT library). If the diagnosis event timestamp is global, we’ll use the timestamp that is stored in these 8 bytes. We need to have a local variable where we can store our intermediate result. I’ll call this variable nDCTime64 and the type will be LWORD. Once we have the timestamp stored in this variable we can convert it into a 29-character string again using a standard Beckhoff function, DCTIME64_TO_STRING(). I ended up with:
IF bIsLocalTime THEN
    nDCTime64 := F_GetCurDcTaskTime64();
ELSE
    nDCTime64.0 := anTimeStampBuffer[1].0;
    nDCTime64.1 := anTimeStampBuffer[1].1;
    nDCTime64.2 := anTimeStampBuffer[1].2;
    nDCTime64.3 := anTimeStampBuffer[1].3;
    nDCTime64.4 := anTimeStampBuffer[1].4;
    nDCTime64.5 := anTimeStampBuffer[1].5;
    nDCTime64.6 := anTimeStampBuffer[1].6;
    nDCTime64.7 := anTimeStampBuffer[1].7;
    nDCTime64.8 := anTimeStampBuffer[2].0;
    nDCTime64.9 := anTimeStampBuffer[2].1;
    nDCTime64.10 := anTimeStampBuffer[2].2;
    nDCTime64.11 := anTimeStampBuffer[2].3;
    nDCTime64.12 := anTimeStampBuffer[2].4;
    nDCTime64.13 := anTimeStampBuffer[2].5;
    nDCTime64.14 := anTimeStampBuffer[2].6;
    nDCTime64.15 := anTimeStampBuffer[2].7;
    nDCTime64.16 := anTimeStampBuffer[3].0;
    nDCTime64.17 := anTimeStampBuffer[3].1;
    nDCTime64.18 := anTimeStampBuffer[3].2;
    nDCTime64.19 := anTimeStampBuffer[3].3;
    nDCTime64.20 := anTimeStampBuffer[3].4;
    nDCTime64.21 := anTimeStampBuffer[3].5;
    nDCTime64.22 := anTimeStampBuffer[3].6;
    nDCTime64.23 := anTimeStampBuffer[3].7;
    nDCTime64.24 := anTimeStampBuffer[4].0;
    nDCTime64.25 := anTimeStampBuffer[4].1;
    nDCTime64.26 := anTimeStampBuffer[4].2;
    nDCTime64.27 := anTimeStampBuffer[4].3;
    nDCTime64.28 := anTimeStampBuffer[4].4;
    nDCTime64.29 := anTimeStampBuffer[4].5;
    nDCTime64.30 := anTimeStampBuffer[4].6;
    nDCTime64.31 := anTimeStampBuffer[4].7;
    nDCTime64.32 := anTimeStampBuffer[5].0;
    nDCTime64.33 := anTimeStampBuffer[5].1;
    nDCTime64.34 := anTimeStampBuffer[5].2;
    nDCTime64.35 := anTimeStampBuffer[5].3;
    nDCTime64.36 := anTimeStampBuffer[5].4;
    nDCTime64.37 := anTimeStampBuffer[5].5;
    nDCTime64.38 := anTimeStampBuffer[5].6;
    nDCTime64.39 := anTimeStampBuffer[5].7;
    nDCTime64.40 := anTimeStampBuffer[6].0;
    nDCTime64.41 := anTimeStampBuffer[6].1;
    nDCTime64.42 := anTimeStampBuffer[6].2;
    nDCTime64.43 := anTimeStampBuffer[6].3;
    nDCTime64.44 := anTimeStampBuffer[6].4;
    nDCTime64.45 := anTimeStampBuffer[6].5;
    nDCTime64.46 := anTimeStampBuffer[6].6;
    nDCTime64.47 := anTimeStampBuffer[6].7;
    nDCTime64.48 := anTimeStampBuffer[7].0;
    nDCTime64.49 := anTimeStampBuffer[7].1;
    nDCTime64.50 := anTimeStampBuffer[7].2;
    nDCTime64.51 := anTimeStampBuffer[7].3;
    nDCTime64.52 := anTimeStampBuffer[7].4;
    nDCTime64.53 := anTimeStampBuffer[7].5;
    nDCTime64.54 := anTimeStampBuffer[7].6;
    nDCTime64.55 := anTimeStampBuffer[7].7;
    nDCTime64.56 := anTimeStampBuffer[8].0;
    nDCTime64.57 := anTimeStampBuffer[8].1;
    nDCTime64.58 := anTimeStampBuffer[8].2;
    nDCTime64.59 := anTimeStampBuffer[8].3;
    nDCTime64.60 := anTimeStampBuffer[8].4;
    nDCTime64.61 := anTimeStampBuffer[8].5;
    nDCTime64.62 := anTimeStampBuffer[8].6;
    nDCTime64.63 := anTimeStampBuffer[8].7;
END_IF

sTimeStamp := DCTIME64_TO_STRING(in := nDCTime64);
Not exactly the most beautiful code I’ve written in my life, but it will do. Running our two unit tests that we defined in part 4 we get the result:

Run-result of FB_DiagnosticMessageTimestampParser_Test
FB_DiagnosticMessageParser
This function block uses the other four function blocks to deliver the final result, so running the tests for this one wraps it up.
A reminder from part 2 of what the function block header looks like:
FUNCTION_BLOCK FB_DiagnosticMessageParser
VAR_INPUT
    anDiagnosticMessageBuffer : ARRAY[1..28] OF BYTE;
END_VAR
VAR_OUTPUT
    stDiagnosticMessage : ST_DIAGNOSTICMESSAGE;
END_VAR

Diagnostic message parser
This FB needs to instantiate an instance of each and one of the four function blocks that we’ve created. Looking at an overview picture:
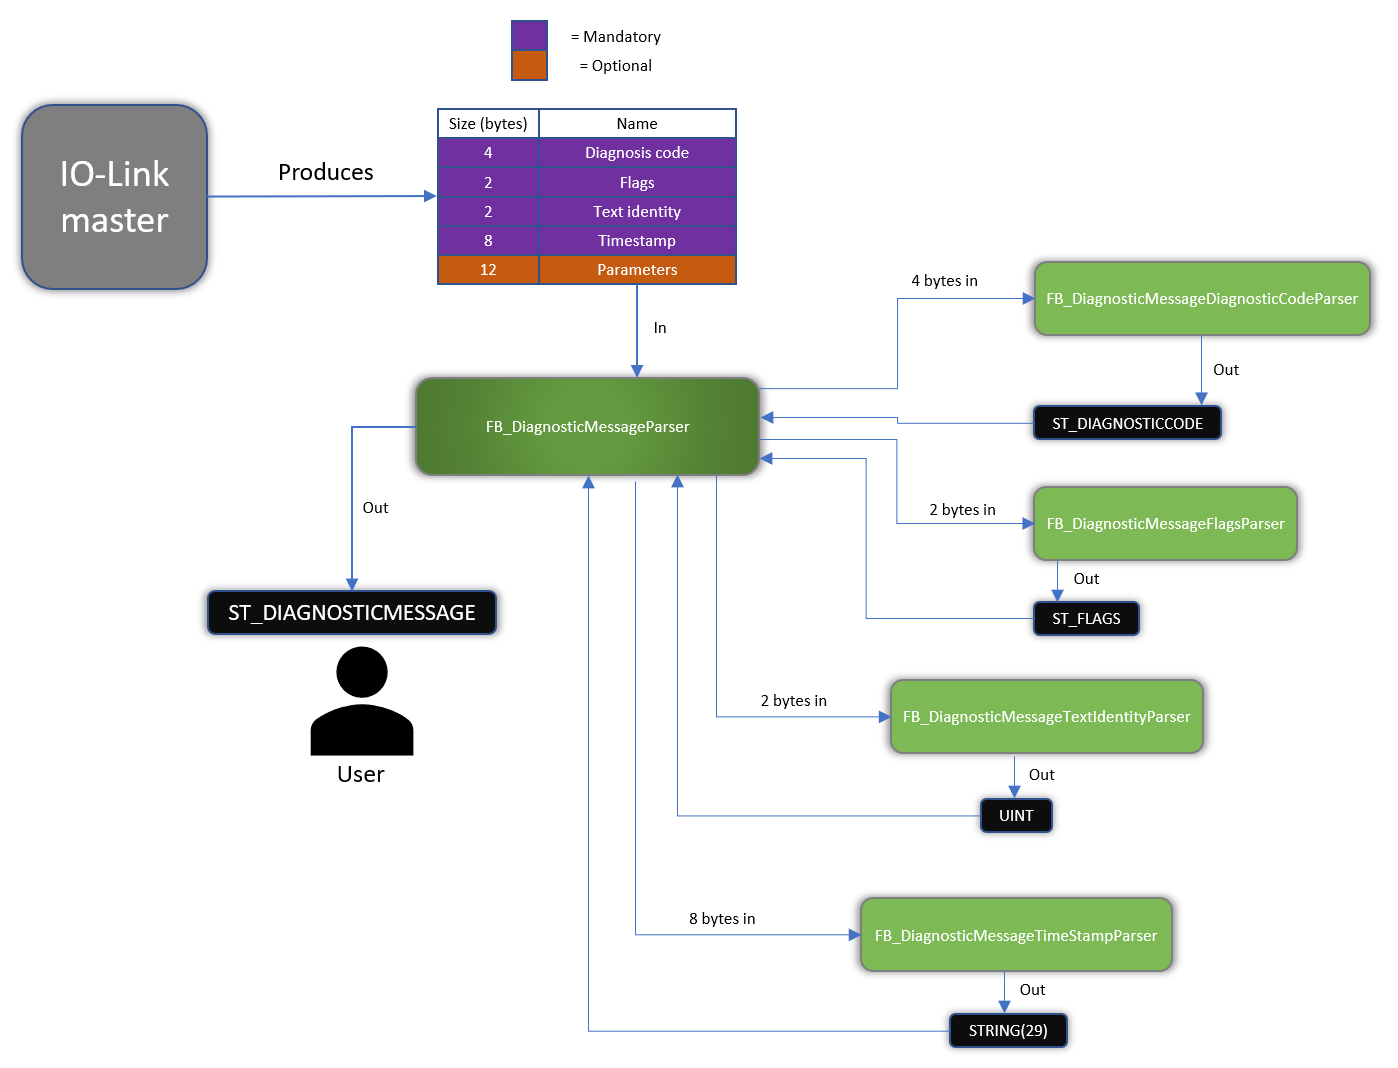
Function block layout
The function block FB_DiagnosticMessageParser (dark green in the middle) needs to take the 28 bytes in the correct order and send them to every other function block to get the final result, which is a structure of the type ST_DIAGNOSTICMESSAGE. Again, for this example we only care about the first 4+2+2+8=16 bytes and ignore the last 12 bytes (which are all optional).
We’ll add some more variables to the header above now that we know what we want.
VAR
    anDiagnosticCodeBuffer : ARRAY[1..4] OF BYTE;
    anFlagsBuffer : ARRAY[1..2] OF BYTE;
    anTextIdentityBuffer : ARRAY[1..2] OF BYTE;
    anTimeStampBuffer : ARRAY[1..8] OF BYTE;

    fbDiagnosticMessageDiagnosticCodeParser : FB_DiagnosticMessageDiagnosticCodeParser;
    fbDiagnosticMessageFlagsParser : FB_DiagnosticMessageFlagsParser;
    fbDiagnosticMessageTextIdentityParser : FB_DiagnosticMessageTextIdentityParser;
    fbDiagnosticMessageTimeStampParser : FB_DiagnosticMessageTimeStampParser;
END_VAR
The four arrays of BYTEs are used as input to the call for all four function blocks.
For the function block body I ended up with:
// Parse diagnostic code
anDiagnosticCodeBuffer[1] := anDiagnosticMessageBuffer[1];
anDiagnosticCodeBuffer[2] := anDiagnosticMessageBuffer[2];
anDiagnosticCodeBuffer[3] := anDiagnosticMessageBuffer[3];
anDiagnosticCodeBuffer[4] := anDiagnosticMessageBuffer[4];
fbDiagnosticMessageDiagnosticCodeParser(anDiagnosticCodeBuffer := anDiagnosticCodeBuffer,
                                        stDiagnosticCode => stDiagnosticMessage.stDiagnosticCode);

// Parse flags
anFlagsBuffer[1] := anDiagnosticMessageBuffer[5];
anFlagsBuffer[2] := anDiagnosticMessageBuffer[6];
fbDiagnosticMessageFlagsParser(anFlagsBuffer := anFlagsBuffer,
                               stFlags => stDiagnosticMessage.stFlags);

// Parse text identity
anTextIdentityBuffer[1] := anDiagnosticMessageBuffer[7];
anTextIdentityBuffer[2] := anDiagnosticMessageBuffer[8];
fbDiagnosticMessageTextIdentityParser(anTextIdentityBuffer := anTextIdentityBuffer,
                                      nTextIdentity => stDiagnosticMessage.nTextIdentityReferenceToESIFile);

// Parse time stamp
anTimeStampBuffer[1] := anDiagnosticMessageBuffer[9];
anTimeStampBuffer[2] := anDiagnosticMessageBuffer[10];
anTimeStampBuffer[3] := anDiagnosticMessageBuffer[11];
anTimeStampBuffer[4] := anDiagnosticMessageBuffer[12];
anTimeStampBuffer[5] := anDiagnosticMessageBuffer[13];
anTimeStampBuffer[6] := anDiagnosticMessageBuffer[14];
anTimeStampBuffer[7] := anDiagnosticMessageBuffer[15];
anTimeStampBuffer[8] := anDiagnosticMessageBuffer[16];
fbDiagnosticMessageTimeStampParser(anTimeStampBuffer := anTimeStampBuffer,
                                   bIsLocalTime := stDiagnosticMessage.stFlags.eTimeStampType = E_TIMESTAMPTYPE.Local,
                                   sTimeStamp => stDiagnosticMessage.sTimeStamp);
Here we are preparing the input for every function block by copying the correct bytes from the total 28 bytes. Then we are calling each and one of the four function blocks and store the result in the total output variable (stDiagnosticMessage). We only prepared one test in part 4 for this function block, but afterwards I have extended it with two additional tests. Each test prepares various combinations of a diagnosis event message, so that we can test as a big diversity as possible. Running our test-program PRG_TEST and looking at the result of the unit tests for this function block we get:

Run-result of FB_DiagnosticMessageParser_Test
Success! Again it’s important for me to point out that at first, these tests failed. I had to continuously rewrite the code and re-run the tests until all the tests passed. This is completely normal, and the whole reason you’ve written the unit tests to start with. As you have all your unit tests, just run them and you will immediately know whether your code is doing what it’s supposed to.
Now that we have all our code tested the next part will be the grand finale. In the next and final part we’ll use our newly developed library function blocks in a project with real hardware, the ultimate test for our newly developed library!
Code listing icon by Freepik from www.flaticon.com